Become familiar with your course through the homepage elements that are available to you.
Text-based navbar
The text-based course navbar uses text to describe the various Brightspace tools available to you.
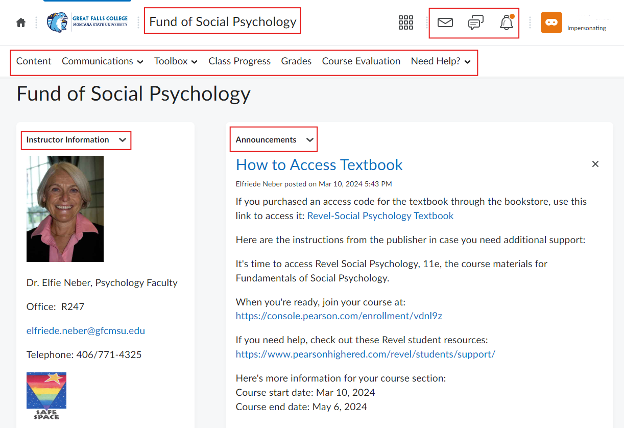
Figure: Course homepage elements with a text-based navbar.
- Course Title: The name of the course offering.
- Alerts: New alerts will be indicated by an orange dot.
- Navbar: Access course materials and activities through navbarlinks
- Content: Allows you to access course materials including assignments, discussions, and quizzes
- Communications: Allows you to see the class listand send course email messages
- Toolbox: This is for instructor use.
- Class Progress: Allows you to see your progress on course content and activities
- Grades: Directs you to the gradebook where you can find your scores forgradeditems
- Course Evaluation: Allows you to access an anonymous evaluation of the course at the end of the term
- Need Help:Provides links to helpful campus services such as the Academic Success Center, Technology Assistance, and Student Support
- Instructor Information: Provides information about the instructor including contact information
- Announcements: Displays any information that your instructor has posted for the entire class to see, including course updates and action items
Video: Navigate Brightspace
Access all your course content and activities in one convenient location.
Visual Tour: Classic Content Experience

Figure: The Content tool interface.
-
Use the Overview page to learn about your course, content materials, and course expectations. You can also print and download an uploaded course syllabus directly from the Content Overview page.
Note: The Print and Download buttons display differently, depending on whether your instructor has enabled this option. -
Click Bookmarks to review a list of topics you have bookmarked. The number beside the Bookmarks link indicates how many bookmarks you have.
-
The Course Schedule page lists course material due dates, start dates, end dates, overdue course activities, and other course events for the next seven days. The dates listed on this page are not exclusive to content topics. Upcoming events include all events within the course from the Calendar tool. The number beside the Upcoming Events link indicates how many upcoming events you have.
-
The Table of Contents panel lists all modules available in your course. The number beside each module name in the Table of Contents panel indicates the number of topics in each module.
Video: Navigate Content
The Assignments tool enables you to upload and submit assignments directly into Brightspace. Simply upload your submission to the appropriate assignment and submit.
Note: If you cannot locate or access the Assignments tool, it may have another name. Contact your instructor for more information.
Visual tour of the Assignments tool

Figure: The Assignments tool is organized into various sections, which are described below.
-
Click Assignments to access the Assignments tool.
-
Click View Historyto review your submission history. You can also sort results by assignment and assignment type.
-
Click an assignment in the list to add files, record audio, record video, add comments, and submit your assignment.
-
Review:
-
Completion Status: Lists a count of any submissions or files submitted for the assignment.
-
Score: Displays a grade or score if the submission was graded.
-
Evaluation Status: Displays feedback from your instructor.
-
Due Date: Displays when your instructor has requested that you complete the assignment.
-
Click Quizzes to review all your future, current, and past quizzes using the Quiz List.
Visual Tour: Quiz List
Your Quiz List page may be organized differently by your instructor to avoid confusion on which quiz
needs to be taken.
Figure: The Quiz List page shows details like Future Quiz, Current Quiz, and Past Quiz. Click any one of these to see the associated quizzes.
-
Click Quizzes to access the Quiz List.
-
Current Quizzes: Active quizzes that are accessible to you and can currently be written.
-
Future Quizzes: Quizzes that haven’t started yet. Even though they are visible to you, they cannot be accessed since the start date hasn’t been reached yet.
-
Past Quizzes: Quizzes that are no longer available to you because they are passedt their end dates. Depending on how Brightspace is configured for your school, these quizzes may or may not be visible to you. If past quizzes are available for you to view, you may access them to view feedback or to review your quiz attempt, but you won’t be able to start them or retake them.
-
Click the arrow icon to access more actions related to a quiz.
-
Review the Evaluation Status and number of allowable Attempts for a quiz.
Video: Quizzes/Exams
Use the Discussions tool to view and subscribe to discussion topics, as well as start new threads.
Visual Tour: Discussions tool
The Discussions tool helps you to create and manage discussions in your course.

Figure: The Discussions tool is organized into various sections, which are described below.
-
Click Discussions to open the Discussions page.
-
Discussions List: Displays an overview of forum topics. Click the topic link to view threads in that topic; or click the drop-down button beside the topic for more options.
-
Subscriptions: Set your default notification method for the discussion items you are subscribed to. You can also click the Change your notification settings link to update your contact methods, summary of activity, and what method is used to receive instant notifications for various tools and features.
-
Filter by: Sort and filter discussion topics.
-
Discussion Forum: Click the arrow to access more actions for the discussion forum.
-
Discussion Topic: Click to open the discussion topic listed or click the arrow to view topics in Grid View or Subscribe to threads.
-
Settings: Configure your personal display options, org unit (course) settings, and the default settings for availability conditions.
-
Help: Learn more about the Discussions tool.
Video: Discussions
Easily review all of your grade items, including points, grade percentages, and comments and assessments. You can also use the Grades tool to add to your ePortfolio.
Visual Tour: Grades

Figure: The Grades tool is organized into various sections, which are described below.
-
Click Grades to review your grade items.
-
Click Add to ePortfolio to add an artifact to your ePortfolio.
-
Review your Grade Items, Points, Grade, and Comments and Assessments.
-
Print your grades.
Video: Grades
Use the Classlist tool to view who is enrolled in your course, send email messages or instant messages, view shared locker files, and read blogs.
Send an email from the Classlist
You can select specific users from your Classlist and send them an email.
To send an email from Classlist
- From your course navbar, click Classlist.
- Click the check box of the user(s) you want to email.

Figure: The Classlist page with the Email option highlighted. - Click Email above the list of users. The Compose New Message window opens.

Figure: The Compose New Message window. -
Enter recipients in the To field. Click Add CC or BCC to include other recipients.
-
Enter a Subject.
-
Write your message in the Body field.
Note: The Body field includes elements of Brightspace Editor. You can include other content by clicking options like Insert Stuff, Insert Quicklink, and Insert Image. Before sending your email, you can change the Priority of your email from Normal to either Low or High.
-
Click Send.
You have sent an email to the selected user(s) from your Classlist.